vanshikamunjal665-containerization-theory.github.io
CONTAINERIZATION AND DEVOPS THEORY
25 MARCH 2026
CLASS TASK: RUN AND MANAGE A “HELLO WEB APP”
Reference Link:
https://upessocs.github.io/#dir=/Lectures/Containerization%20and%20DevOps/Theory/003%20Unit%203/&file=306%20Apache%20webserver%20deploy%20using%20kubernetis.md
📌 Objective
Deploy and manage a simple Apache-based web server using Kubernetes and perform the following tasks:
- Run the application
- Verify it is running
- Access the application
- Scale the application
- Debug and fix issues
Screenshots of commands

🧾 Step-wise Explanation of Commands
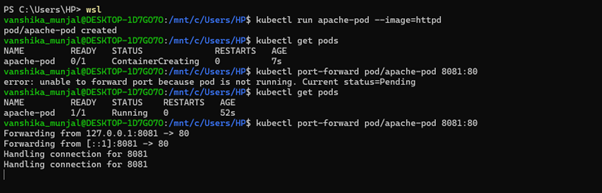
🔹 Step 1: Run a Pod
Command:
kubectl run apache-pod --image=httpd
Explanation:
This command creates a Pod named apache-pod using the Apache (httpd) image.
🔹 Step 2: Verify Pod Status
Command:
kubectl get pods
Explanation:
This command checks the status of the Pod. Initially, it shows ContainerCreating, and after some time it changes to Running.
🔹 Step 3: Access the Application
Command:
kubectl port-forward pod/apache-pod 8081:80
Explanation:
This command forwards local port 8081 to container port 80, allowing access to the web application.
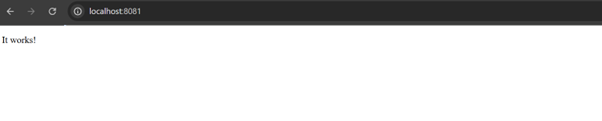
Open in Browser:
http://localhost:8081
Output:
The Apache default page (“It works!”) is displayed.
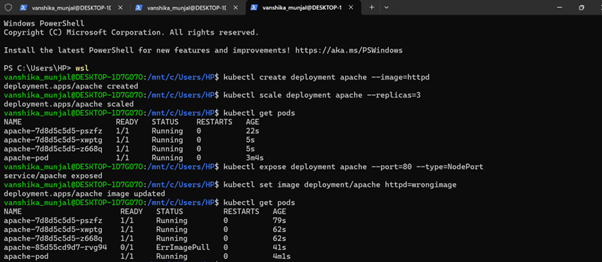
🔹 Step 4: Create Deployment
Command:
kubectl create deployment apache --image=httpd
Explanation:
This command creates a Deployment named apache, which manages Pods and supports scaling.
🔹 Step 5: Verify Deployment
Command:
kubectl get deployments
kubectl get pods
Explanation:
These commands verify that the Deployment is created and Pods are running.
🔹 Step 6: Scale the Application
Command:
kubectl scale deployment apache --replicas=3
Explanation:
This command increases the number of Pods to 3, improving availability and load handling.
🔹 Step 7: Verify Scaling
Command:
kubectl get pods
Explanation:
This confirms that multiple Pods (3 replicas) are running.
🔹 Step 8: Expose Deployment
Command:
kubectl expose deployment apache --port=80 --type=NodePort
Explanation:
This exposes the Deployment as a Service, enabling external access.
🔹 Step 9: Break the Application (Debugging)
Command:
kubectl set image deployment/apache httpd=wrongimage
Explanation:
This intentionally sets an incorrect image to simulate a failure scenario.
🔹 Step 10: Check Error
Command:
kubectl get pods
Explanation:
Some Pods enter ErrImagePull or ImagePullBackOff, indicating failure to fetch the image.
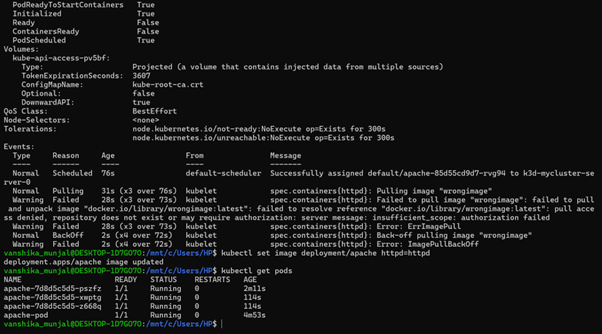
🔹 Step 11: Diagnose the Issue
Command:
kubectl describe pod <pod-name>
Explanation:
This shows detailed Pod information. The Events section reveals the image pull failure.
🔹 Step 12: Fix the Application
Command:
kubectl set image deployment/apache httpd=httpd
Explanation:
This restores the correct image and resolves the issue.
🔹 Step 13: Final Verification
Command:
kubectl get pods
Explanation:
All Pods return to the Running state, confirming successful recovery.
✅ Conclusion
The Apache web application was successfully deployed, accessed, scaled, debugged, and restored using Kubernetes.
🔥 Key Learnings
- Kubernetes Pods run containerized applications
- Deployments help in scaling and managing Pods
- Services expose applications externally
- Errors like
ErrImagePullhelp identify issues - Kubernetes supports self-healing and easy debugging